
What’s on your screen has to be saved occasionally. Perhaps you find something you want to keep for future quick access, or maybe you want to share with friends or relatives. Fortunately, taking screenshots of all or a portion of your screen is simple and can be done with a few different apps in Windows 10 and Windows 11.
You have a few options for techniques. Here are the top methods for how to capture screen on windows, regardless of whether you want to save the whole screen or just a portion of it.
Table of Contents
How to take a screenshot on Windows
1. Print Screen (PrtScn) Key
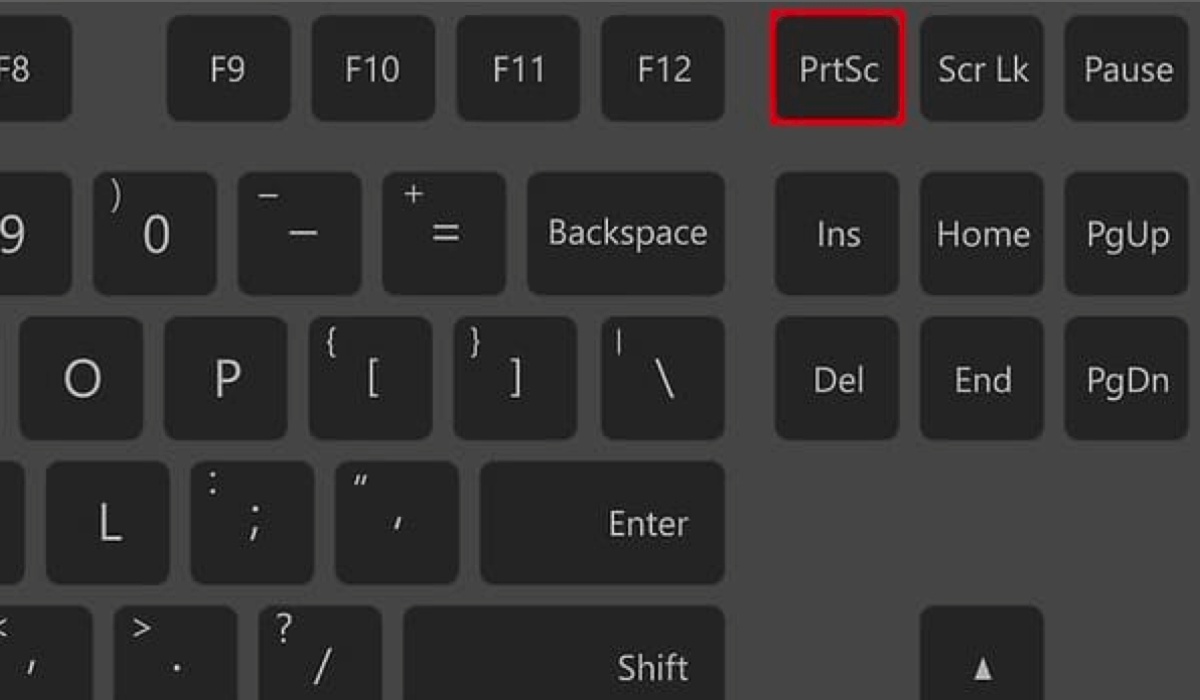
To easily capture the entire screen on Windows 10 or Windows 11, simply press the Print Screen (PrtScn) key on your keyboard. The screen capture will be automatically copied to the clipboard, or you can save it directly to your screenshot folder. To save the file, open any image-inserting program such as Microsoft Word, Paint or Photoshop, then paste the screen capture by pressing Ctrl + V. It’s as simple as that – you now have your screen capture image ready!
2. Windows key + Print Screen
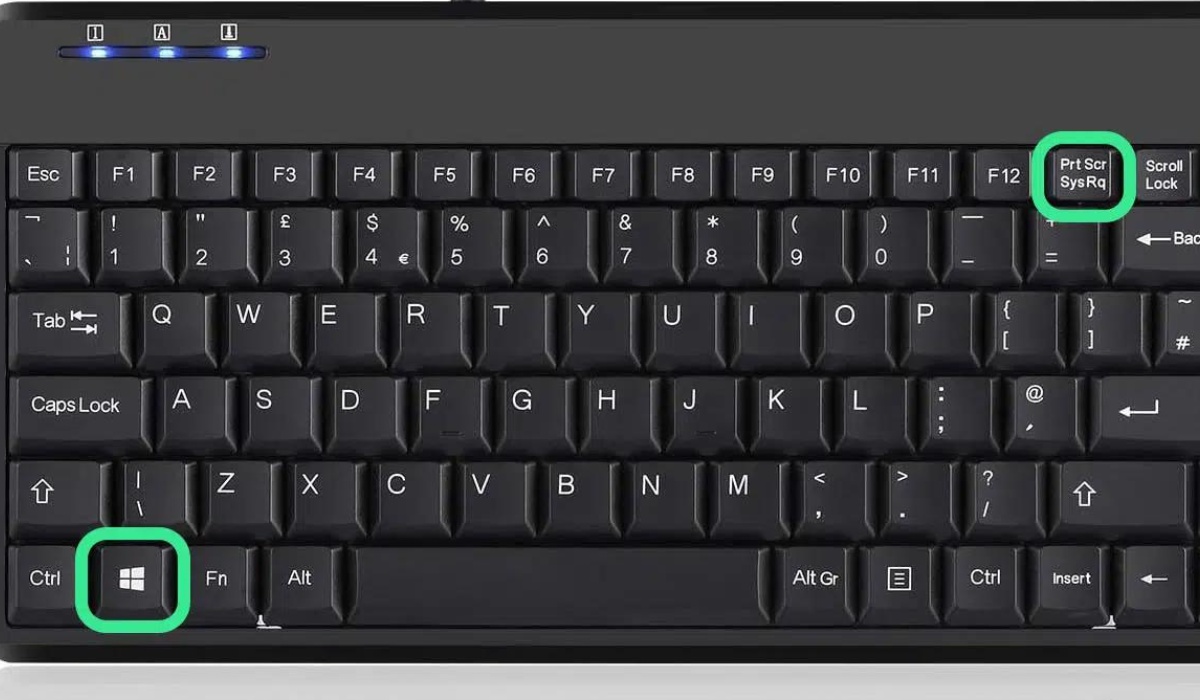
To capture the entire screen and automatically save the file to the Screenshots folder, follow these steps: press the Windows key + Print Screen. The screen will briefly dim, confirming the screenshot. The image file will be automatically saved to the Pictures > Screenshots folder. To access this folder, open File Explorer (Windows + E), select Pictures in the left-hand control panel. If using OneDrive, the screenshot will also be automatically saved there. Follow these steps for easy management and retrieval of your screen capture images.
3. Alt + PrtScn for Active Window
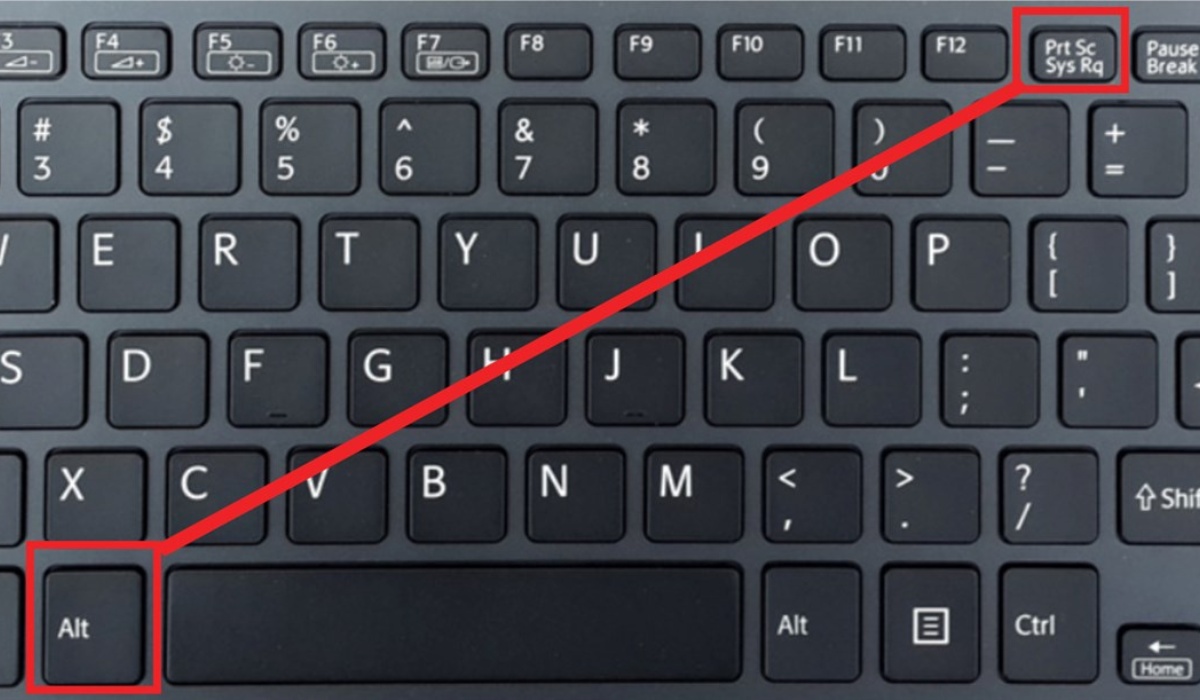
To quickly capture a screenshot of the active window, use the shortcut Alt + PrtScn. This action will capture the currently active window and copy the image to the clipboard. You just need to open an image editing program to save the screenshot.
4. No Print Screen key
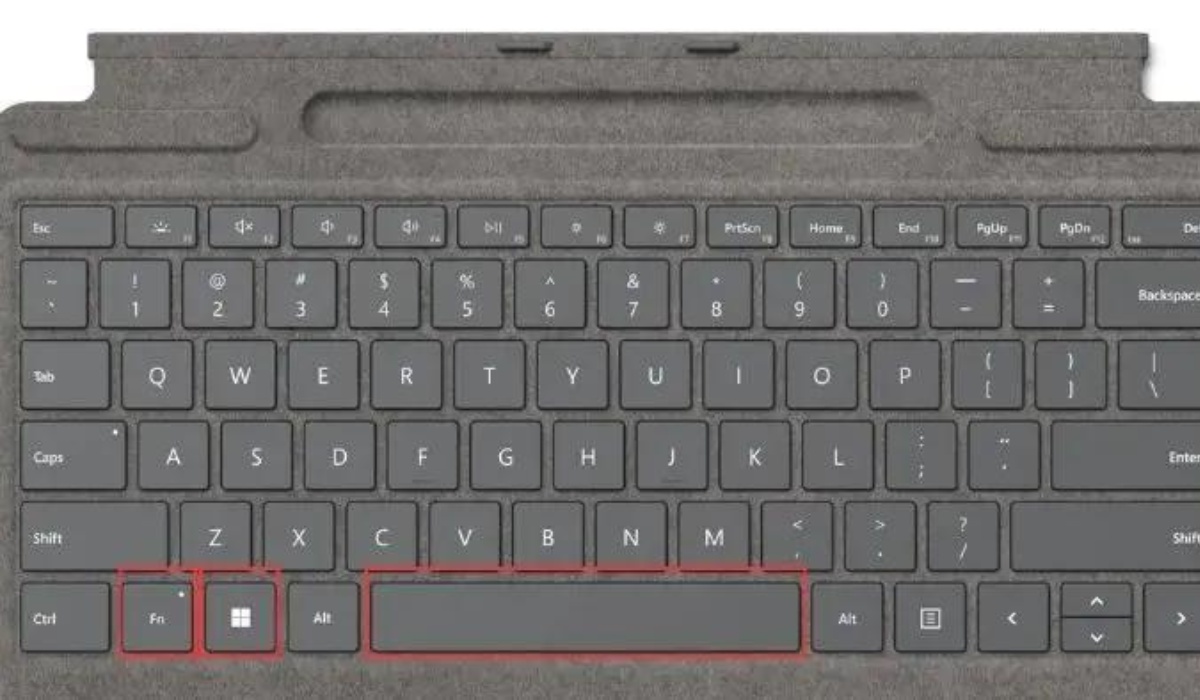
If your computer lacks the PrtScn key, don’t worry, Microsoft has provided an alternative shortcut for you. You can use the combination of Fn + Windows logo key + Space Bar to swiftly capture a screenshot. The image will be automatically saved in the Pictures > Screenshots folder. This enables you to manage and access your screenshots easily without the need to search through multiple folders.
5. Snip & Sketch
Maybe you would like to take a Windows screenshot with the desktop shown in tiny format. It may be a window sequence or a section of a webpage in your browser. In either scenario, press Windows Key + Shift + S to open the Windows Snipping tool. This will give you a rectangle box that you can create around any Windows 10 or Windows 11 object that you wish to take a picture of.
It should be noted that Windows 10 has two built-in screenshot tools: Snipping Tool and Snip & Sketch Tool, with the latter being the more recent version that Microsoft suggests. In Windows 11, the built-in screenshot tool is called “Snipping Tool.” The keyboard shortcut opens the appropriate one, regardless of what you title it.
There are more options available if you don’t want to take a screenshot of a specific area of the Windows desktop, such as freeform sketching a shape, capturing the active window, or taking a full-screen picture. In addition to being copied to the clipboard, your snapshot will also be shown as a Windows notification. By clicking on this notice, you can edit the screenshot by highlighting specific areas with a highlighter, cropping it, or drawing on top of it.
6. Snipping Tool
There has been a Snipping Tool available. Although Windows has been announcing for a few years that the Snipping Tool will be discontinued, it remains functional in Windows 11. Although the Snipping Tool is no longer available in the Start menu’s app list, you can still quickly find it using the search bar.
Press the New button to start taking a screenshot. Rectangular snips are the default, but you may also capture full-screen, window, and free-form snips.
Snipping Tool copies your grabs to the clipboard automatically, but it does not save your screenshots; you will need to save them manually in the tool before you close it.
7. The Game Bar
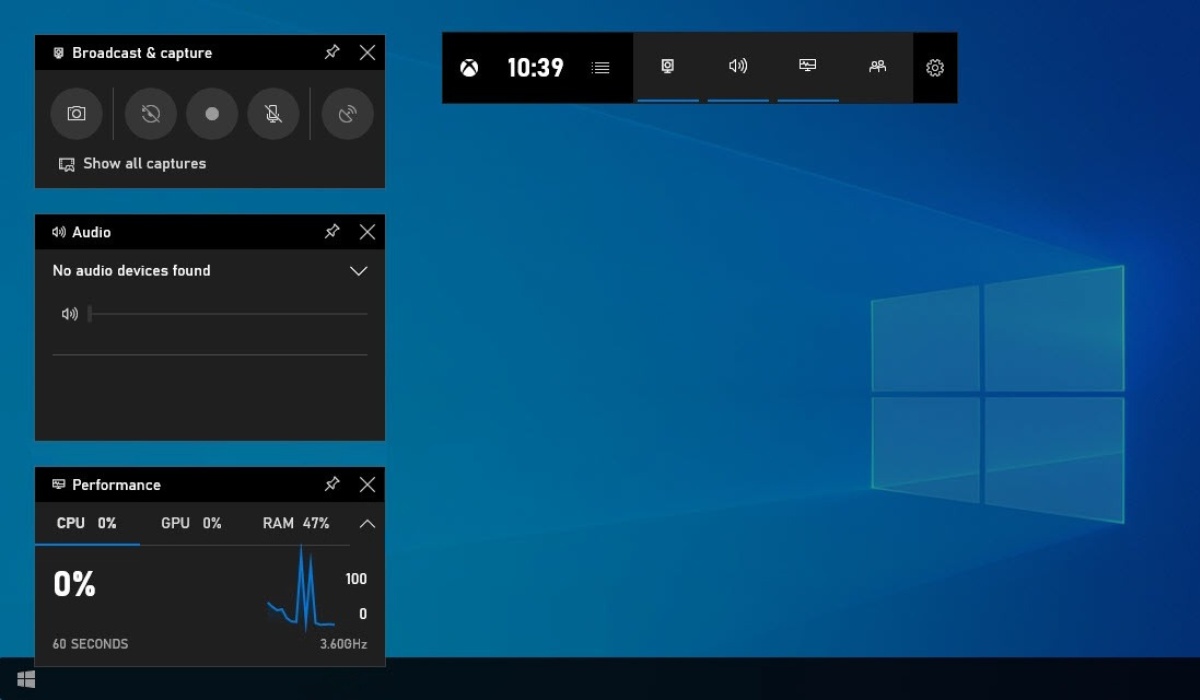
To capture screenshots or record videos while gaming, utilize the Game Bar. Activate the Game Bar from settings by pressing Windows + I, select Gaming > Xbox Game Bar. Enable the Record clip and Screenshot features. Once enabled, press Windows + G to open the Game Bar. Click the Capture button or use the shortcut Windows + Alt + PrtScn to capture the entire screen. In the Capture menu, click the camera icon to take a screenshot. Record a video by pressing the record button, with optional sound (microphone icon). Images and videos will be saved in PNG and MP4 formats in the Video > Captures folder in File Explorer. Locate them through the Game Bar Library, click Show my captures > View captures below the screenshot and record button in the Capture menu.
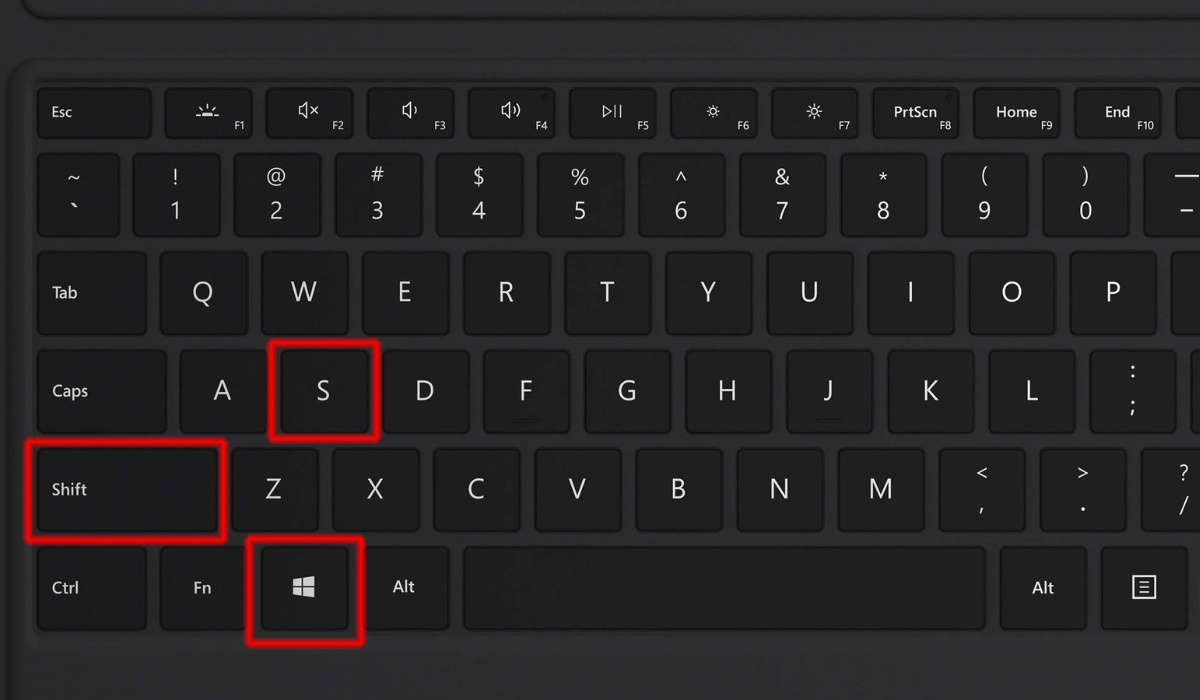
8. Windows Logo + volume down
If you’re using a Microsoft Surface device, capturing a screenshot follows a similar process to other phones or tablets. To do this, hold down the Windows Logo touch button at the bottom of your Surface screen and press the physical volume down button on the tablet’s side. The screen will briefly dim, and the screenshot will automatically be saved to the Pictures > Screenshots folder. This makes it easy for you to manage and find your screenshots without having to spend much time searching through different folders on your device.
9. Third-Party Screen Capture Software
Outside of the built-in capabilities, third-party software such as Snagit, Greenshot, and Lightshot provides a broad feature set for customers looking for more customization choices and advanced functionality.
Snagit: Well-known for its robust editing suite, Snagit is capable of more than just taking screenshots. With its many options, users can annotate photographs, record their screen, and make GIFs. Snagit is a well-liked option for professional use because of its intuitive layout and capacity to record scrolling screenshots.
Greenshot: This open-source utility is powerful but lightweight. Greenshot offers a simple method for taking screenshots or capturing particular areas. It excels at providing a wide range of annotation tools and facilitates the export of screenshots in several formats. For those searching for an effective, affordable, and user-friendly solution, Greenshot is perfect.
Lightshot: Known for its speed and ease of use, Lightshot makes it simple for users to record any area of the screen. It provides quick screenshot sharing and some basic editing features. Lightshot is the preferred alternative for individuals who value simplicity and speed because of its user-friendly layout and rapid sharing possibilities.
Users can select the third-party tool that best suits their particular screen capturing and editing requirements by considering the distinct advantages that each one of these applications offers.
Conclusion
With the precision control that Snipping Tool and Snip & Sketch offer over the area you capture, you may modify and annotate right away. The Print Screen (PrtScn) key provides a simple way for basic captures, and Windows + Shift + S is a rapid shortcut for capturing specified locations.
Pick the approach that works best for you, whether it’s Snipping Tool’s adaptability, the PrtScn key’s simplicity, or Snip & Sketch’s cutting-edge functionality. You may easily record and share your Windows screen with the help of the programs in this article about how to capture screen on windows.